
NeetoCal lets you create multiple intro pages. Each intro page acts as a central hub where you can showcase a curated selection of your meetings. This allows clients to easily browse and choose the meeting that best fits their needs.
Each intro page can display a unique set of scheduling links, a custom title, and a brief description. By default, NeetoCal shows one intro page, which is the default one. You cannot delete that default intro page. It can be differentiated from the other intro pages by the "homepage" tag that is displayed in the table.
Setting up a new intro page
Click on the Intro Pages tab from the left sidebar.
Click Add new intro page button.
Upload your logo to maintain brand consistency.
Enter a suitable Title for your intro page, such as your workspace name, or customize it as desired.
Optionally, you may add a Description to provide additional context.
Now, select the specific Scheduling Links you would like to display on the intro page.
Click Reorder to change the order of the links on the intro page.
A left sidebar will open, and from there you can set the order of scheduling links.
Click Save changes.
To preview your newly created intro page, click the View intro page link located at the top-right corner.
Customizing intro page theme
You can customize the intro page theme with brand-consistent colors. You can set the title colors, description color, card background color, and more.
Click on the Intro Pages tab from the left sidebar.
Click on the Intro Page you want to customize the theme for.
Click on Theme.
Make the changes.
And click on save changes.
Choose packages to display on the intro page
Click on the Intro Pages tab from the left sidebar.
Click on the Intro Page you want to add packages to.
Click on Packages next to the scheduling link.
Select the packages you want to display on the intro page.
Click on Save changes.
Make intro page password protected
If you want your intro page to be accessible to specific users, ensuring it stays private while remaining accessible to the intended users, you can set password protection.
This is useful when you want to share your availability or services with a specific group, like premium clients, internal teams, or event attendees, without making it public.
Click on the Intro Pages tab from the left sidebar.
Click on triple (...) dots on the intro page where you want to set the password.
Click on Edit.
Enable password protection.
Set the password.
Click on Save changes.
Embedding intro page on your website
Click on the Intro Pages tab from the left sidebar.
Click on the Intro Page you want to add the embed to.
Click on Embed tab.
-
NeetoCal provides the following embed/widget options to choose from:
Inline Embed
Pop-up via sticky button
Pop-up via custom trigger
Iframe embed
These embedding options work the same way as booking page embeds.
SEO for Intro pages
SEO (Search Engine Optimization) makes your intro page appear in search results (like Google). This helps people find you online easily without needing a direct link.
SEO elements
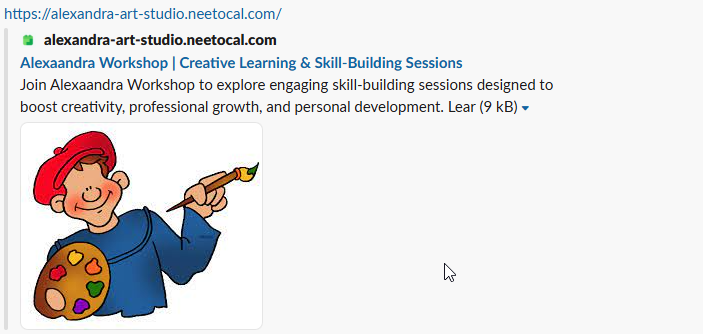
Here's how the different SEO elements appear.
Meta Title:
Alexaandra Workshop | Creative learning &...Meta Description:
Join Alexaandra Workshop to explore engaging skill-building sessions designed to boost...Social Share Image: The cartoon image of the person painting.
Social share image
Social share image is automatically taken from intro page's logo you set. There is no any separate settings required for social share image.
Setting meta title and meta descriptions
Click on the Intro Pages tab from the left sidebar.
Click on the intro page where you want to include SEO.
Click on SEO.
Click on Configure.
A pane will appear.
Enter the Page title , Meta Keywords and Meta description.
Click on Save changes.